Contents:
Step 1: Add Accounting and Reporting functionality
Step 2: Connect and manage your accounts
Step 3: Access reports
Autobooks offers so much more than invoicing and payment acceptance. Our solution includes everything you need to help you manage and grow your small business. For a small monthly fee, you can access accounting and reporting capabilities right in your Autobooks account within online banking.
This guide is designed to help you get started quickly with accounting and reporting. We’ve provided three steps below — the first one will take you through the simple process of adding on these powerful capabilities.
What if I’m not sure if I need accounting and reporting functionality?
If you’re not sure if the Autobooks accounting and reporting features are for you, we suggest that you take a look at the lists below. You might be surprised at all the features and capabilities Autobooks can offer for one low monthly fee.
A quick overview of what these features include:
- View and categorize your bank account transactions to track expenses
- Sync additional account transactions to access all your business expenses in one place
- Budgeting tool to keep spending on track
- Robust financial reports that can be exported and shared as needed
Who can benefit from these features:
- If you struggle to keep up with expense tracking
- If you have a tough time creating reports like Profit & Loss statements
- If you need help communicating business activity to a part-time bookkeeper, your banker, or a tax preparer
What if I have questions or need to learn more?
If you’re ready to go beyond the steps provided here, we suggest that you visit the Autobooks Support Center. There, you will find a wide range of how-to articles and videos. It’s a growing resource, so if you don’t see something that you’re looking for, please let us know. Just submit a support ticket at the top, and we’ll get back to you.
Step 1:
Add Accounting and Reporting functionality
Adding accounting and reporting functionality inside Autobooks only takes a few minutes — just follow the steps below to upgrade now.
Your monthly subscription fee will be debited from your bank account every 30 days from the date you performed your upgrade. For example, if you upgraded your account on the 12th of the month your subscription fee would be debited on the 12th day of every month ongoing.
How to upgrade:
- Within your Invoice or Payment tools, locate and select a tab labeled Accounting.
- Next, you'll see an informational page about our upgraded services. To upgrade, click Enable Now.
Once you’ve upgraded, you can access the accounting and reporting features immediately. Just select Autobooks from the main menu inside online or mobile banking. After that, you’ll see the various menu items described in the steps that follow.
Step 2:
Connect and manage your accounts
To take full advantage of the accounting and reporting features, it’s best to link all of your business accounts into Autobooks to create a holistic picture of your business transactions. It doesn’t matter if you maintain accounts at another financial institution. Autobooks makes it easy to link any external accounts, including business credit cards, so you can view and categorize all of your business transactions in one place. And thanks to our built-in integrations, there’s no need to add transactions manually.
How to link an account:
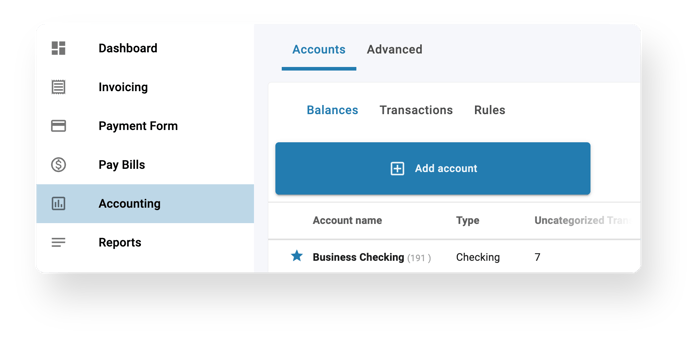
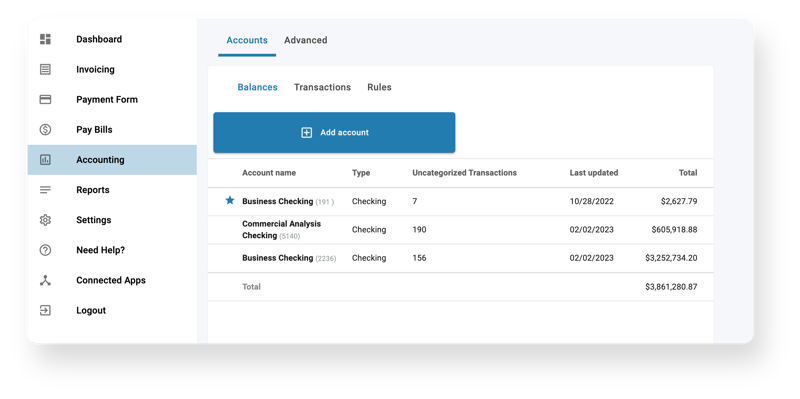
- Click Accounting in the left-side navigation. From the Accounts tab, select Balances.
- Click the Add account button. Select your financial institution from the provided tiles. If you don’t see it, you can do a search by entering the company name in the field below.
- Follow the onscreen directions to enter your account details, verify your account, and view the transactions inside Autobooks.
View Balances
It’s important to stay on top of all of your balances to ensure ample working capital, especially as you begin to make payments to vendors and the like.
This view displays your main checking account, as well as any other accounts that you’ve added in the step above. The list includes account names, account types, the number of uncategorized transactions, the last date that the system was able to sync up with this account, and the total balances for each account.
To view your account balances:
- Click Accounting in the left-side navigation.
- From the Accounts tab, select Balances to view details about each of your deposit accounts that are linked to Autobooks.
View and categorize transactions
Autobooks automatically categorizes all payments you’ve processed through it — saving time and reducing errors. You can categorize other transactions manually, or even set up rules to skip manual categorization tasks. You can also view all of the transactions for your connected accounts in one screen.
To view your transactions:
- Click Accounting in the left-side navigation.
- From the Accounts tab, select Transactions to view details about each of your transactions for accounts that are linked to Autobooks.
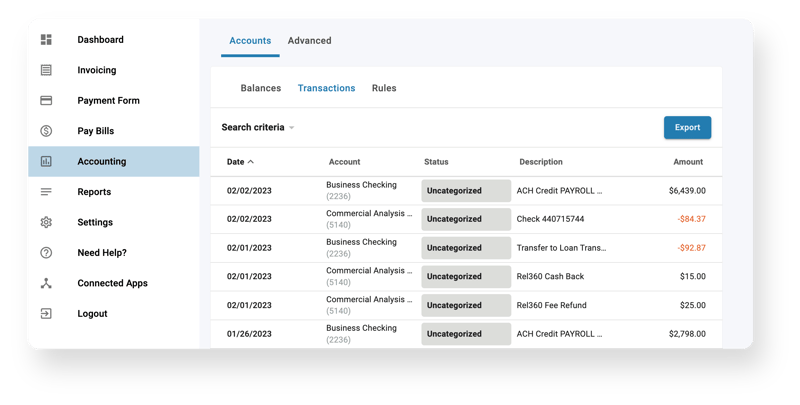
To categorize a transaction:
- From the list, you can click on any transaction to categorize it.
- Click Categorize transaction from the right-side box to:
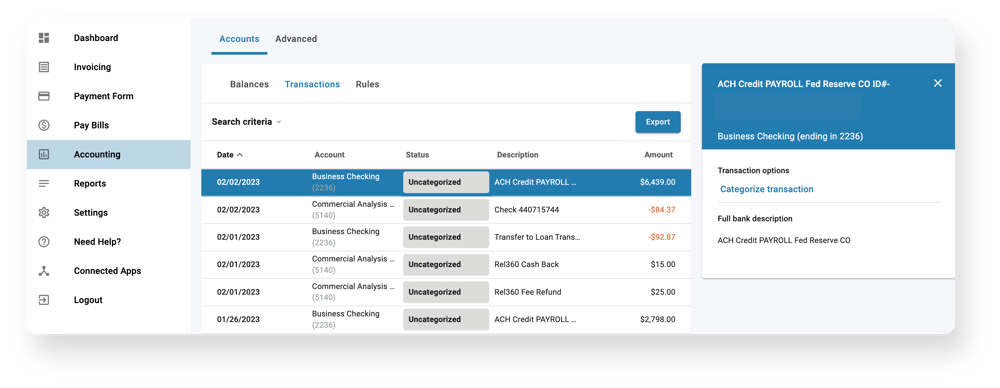
- Categorize the transaction: Assign the transaction to any specific accounting category (or categories).
- Exclude: This option will exclude the transaction from impacting any of the internal bookkeeping.
Create and assign rules
If you have regular transactions that use the same category, you can set up rules to categorize them automatically. To help with this automation, Autobooks allows you to apply one rule per transaction, starting with the first rule in the list. For this reason, it’s important that you order the rules carefully.
To create a new rule:
- Click Accounting in the left-side navigation.
- From the Accounts tab, select Rules to view details about each of your existing rules.
- Click New rule button to create a new rule. Enter your rule conditions in the fields provided.
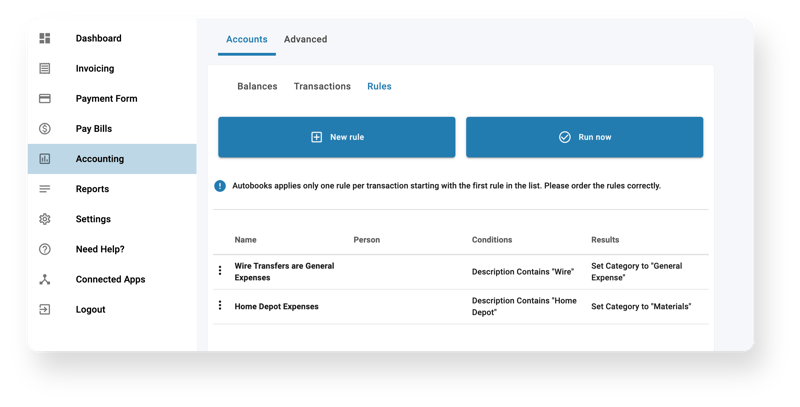
You can click the Run now button to apply all of your rules immediately. Your rules will still run automatically each day.
To learn more about rules, please refer to our support article: Automatically categorize transactions through Rules.
Step 3:
Access reports
Autobooks ensures you have all the information you need at your fingertips — like profit and loss statements, balance sheets, and more — inside the Reports menu. These reports make filing taxes easier, but they also come in handy when you need to secure financing, among other activities.
To select a specific report:
- Click Reports in the left-side navigation.
- Select your report from the list provided.
Any report can be exported as an XLS file and viewed in Excel. Just click the Export button at the top.
Types of reports
Customer Balances: Sometimes called accounts receivable aging, this report tells you which customers owe you money, how much, and how long they have owed it to you.
Vendor Balances: Sometimes called accounts payable aging, this report tells you which vendors you owe money to, how much, and how long you have owed it to them.
Sales Tax: This report shows you how much sales tax you’ve collected and remitted.
Fee Details: This report shows you how much you've paid in fees to Autobooks for each of your transactions through invoices, payment form, and other sources.
Profit and Loss: Sometimes called the Income Statement, this report subtracts your expenses from your income to give you Net Income, also known as the bottom line.
Balance Sheet: This is a snapshot of what your company owns and owes; a summary of your assets, equity, and liabilities.
Journal: Sometimes called the General Ledger, this report shows you the accounting impact, the debits and credits, behind all of your transactions.
Budget: This report compares your estimated income and expenses to your actual income and expenses. It shows you how close you are to your budget goals.
Bank Reconciliation: This report confirms that the cash in your accounting system matches the cash in your bank.
Get started with AutobooksAutobooks is offered in partnership with hundreds of small-business-friendly banks and credit unions, nationwide. If you don’t currently use Autobooks, you can contact a partnering financial institution from our growing list. If you still have questions or need specific help, please visit the Autobooks Support Center. You can access a variety of how-to content there, or just submit a support ticket to chat with one of our support specialists. |